The BLOCKS SDK
Music Gen

Introduction

Develop a MIDI note music generator with interesting visuals on the Lightpad Block.

Launch the BLOCKS CODE application and open the script called MusicGen.littlefoot. You can find the script in the littlefoot/scripts/Example Scripts folder. If you don't have the BLOCKS CODE IDE installed on your system, please refer to the section Getting started with BLOCKS CODE for help.

Initial Setup

Let's first start by defining global parameters for our app such as the speed, root note and chord for our music generator like so:

<metadata description="Music Gen - Tap to create an emitter, tap again to change its direction. Mode button resets.">
<variables>
<variable name="speed" displayName="Speed" type="float" min="0" max="5" value="1" />
<variable name="rootNote" displayName="Root Note" type="midiNote" value="C1" />
<variable name="chord" displayName="Chord" type="option" value="Major" options="Major;Minor" />
</variables>
</metadata>

We also need to define global variables such as colours, bullet direction and coordinates, blob direction and coordinates as well as the last note played and the number of note generators on the screen.

int green;
int red;
int blue;
int yellow;
int count;
float bullet1x;
float bullet1y;
//...
int bullet1d;
//...
int blob1x;
int blob1y;
//...
int blob1d;
//...
int lastNote1;
//...

In the initialise() function of our script, we first clear the display and send a MIDI CC message to turn all MIDI notes off thus resetting both the visual and audio states of the app. We also initialise all the variables to default values and set the colours we want to use.

void initialise()
{
sendCC (0, 120, 127);
blob1x = -99;
//...
blob1y = -99;
//...
blob1d = 3;
//...
bullet1x = -99;
//...
bullet1y = -99;
//...
green = 0x2200FF00;
red = 0x22FF0000;
blue = 0x220000FF;
yellow = 0x22FFFF00;
count = 0;
}
void initialise()
Called when a program is loaded onto the block and is about to start.
void sendCC(int channel, int controller, int value)
Sends a controller message.
void clearDisplay()
Clears the display and sets all the LEDs to black.

In order to reset the state of the music generator at anytime, we implement the handleButtonDown() callback to initialise the state of the app when the side button of the Lightpad is pressed.

void handleButtonDown (int index)
{
}
void handleButtonDown(int index)
Called when a button is pushed.

In the repaint() function we first clear the display and perform 4 sequential operations every time the screen is refreshed: paint blobs, draw bullets, update bullets and detect bullets. These functions are each defined later on.

void repaint()
{
paintBlob (blob1x, blob1y, blob1d);
//...
drawBullet (bullet1x, bullet1y, blob1d);
//...
updateBullet1();
//...
detectBullet();
}
void repaint()
Use this method to draw the display.

Drawing Blobs and Bullets

Now let's take a look at drawing various elements on the screen. The blobs that start shooting the note bullets are drawn using the following paintBlob() function:

void paintBlob (int x, int y, int type)
{
if (type == 0)
{
fillRect (green, x, y - 1, 1, 2);
blendRect (green, x - 1, y, 3, 1);
}
else if (type == 1)
{
fillRect (red, x, y, 2, 1);
blendRect (red, x, y - 1, 1, 3);
}
else if (type == 2)
{
fillRect (blue, x, y, 1, 2);
blendRect (blue, x - 1, y, 3, 1);
}
else if (type == 3)
{
fillRect (yellow, x - 1, y, 2, 1);
blendRect (yellow, x, y - 1, 1, 3);
}
}
void blendRect(int argb, int x, int y, int width, int height)
Blends a rectangle on the display with a specified colour.
void fillRect(int rgb, int x, int y, int width, int height)
Fills a rectangle on the display with a specified colour.

Depending on the direction of the blob we decide to draw the shapes using different colours and we use the blendRect() function to blend the pixel of the overlapping coordinate. Similarly, we draw the bullets with the drawBullet() function depending on the direction of the corresponding blob.

void drawBullet (float x, float y, int d)
{
fillPixel (0xFF222222, int (x), int (y));
if (d == 0)
{
fillPixel (0xFFFFFF, int (x), int (y - 1));
}
else if (d == 1)
{
fillPixel (0xFFFFFF, int (x + 1), int (y));
}
else if (d == 2)
{
fillPixel (0xFFFFFF, int (x), int (y + 1));
}
else
{
fillPixel (0xFFFFFF, int (x - 1), int (y));
}
}
void fillPixel(int rgb, int x, int y)
Sets a pixel to a specified colour with full alpha.

Handling Touch Events

Up until now, the script would not draw anything on the screen as touch events are not handled yet and default coordinates are set to be out of bounds with the screen coordinates. Let's implement the touchStart() callback to process touch events.

void touchStart (int touchIndex, float x, float y, float z, float vz)
{
int intX = int (x * 7);
int intY = int (y * 7);
int touch = touchBlob (intX, intY);
if (touch >= 1)
{
changeBlob (touch);
}
else if (count < 5)
{
if (z < 0.05)
{
assignBlob (intX, intY, count, 0);
}
else if (z < 0.2)
{
assignBlob (intX, intY, count, 1);
}
else if (z < 0.5)
{
assignBlob (intX, intY, count, 2);
}
else
{
assignBlob (intX, intY, count, 3);
}
++count;
}
}
void touchStart(int index, float x, float y, float z, float vz)
Called when a touch event starts.

In the above function, we first convert the device coordinates into LED grid coordinates by multiplying both x and y variables by 7. Device coordinates are defined using the number of DNA connectors on the side of the device so for example in the case of a Lightpad Block, the device has a size of 2x2 and therefore the device coordinates will range from 0.0 to 2.0 on each x and y dimensions. Multiplying this range by 7 gives us the LED grid coordinates ranging from 0 to 14 inclusive.

Now using these grid coordinates, we use the touchBlob() helper function defined below to check whether the touch event was performed on a previously drawn blob and return its index. If no previous blobs were touched, we return 0 to indicate the creation of a new one.

int touchBlob (int x, int y)
{
int touch = 0;
if (x >= (blob1x - 1) && x <= (blob1x + 1) && y >= (blob1y - 1) && y <= (blob1y + 1))
{
touch = 1;
}
//...
return touch;
}

The changeBlob() function is called in the touchStart() callback when an existing blob is touched and updates the index for its direction to update the orientation.

void changeBlob (int blob)
{
if (blob == 1)
{
if (blob1d < 3)
{
++blob1d;
}
else
{
blob1d = 0;
}
}
//...
}

If the creation of a new blob was requested from the touchStart() callback, depending on the pressure of the touch event we spawn a different type of blob at the specified coordinate and call the corresponding function to spawn a bullet.

void assignBlob (int x, int y, int index, int type)
{
if (index == 0)
{
blob1x = x;
blob1y = y;
blob1d = type;
spawnBullet1();
}
//...
}

To spawn a bullet we simply assign the coordinates and direction of the blob to the bullet which overwrites the default values and makes the bullet appear within the screen coordinates.

void spawnBullet1()
{
bullet1x = blob1x;
bullet1y = blob1y;
bullet1d = blob1d;
}
//...

The position of the bullet is updated from the repaint() function by incrementing or decrementing the corresponding x or y coordinate by the speed variable defined as an IDE parameter which consequently moves the bullet on the screen.
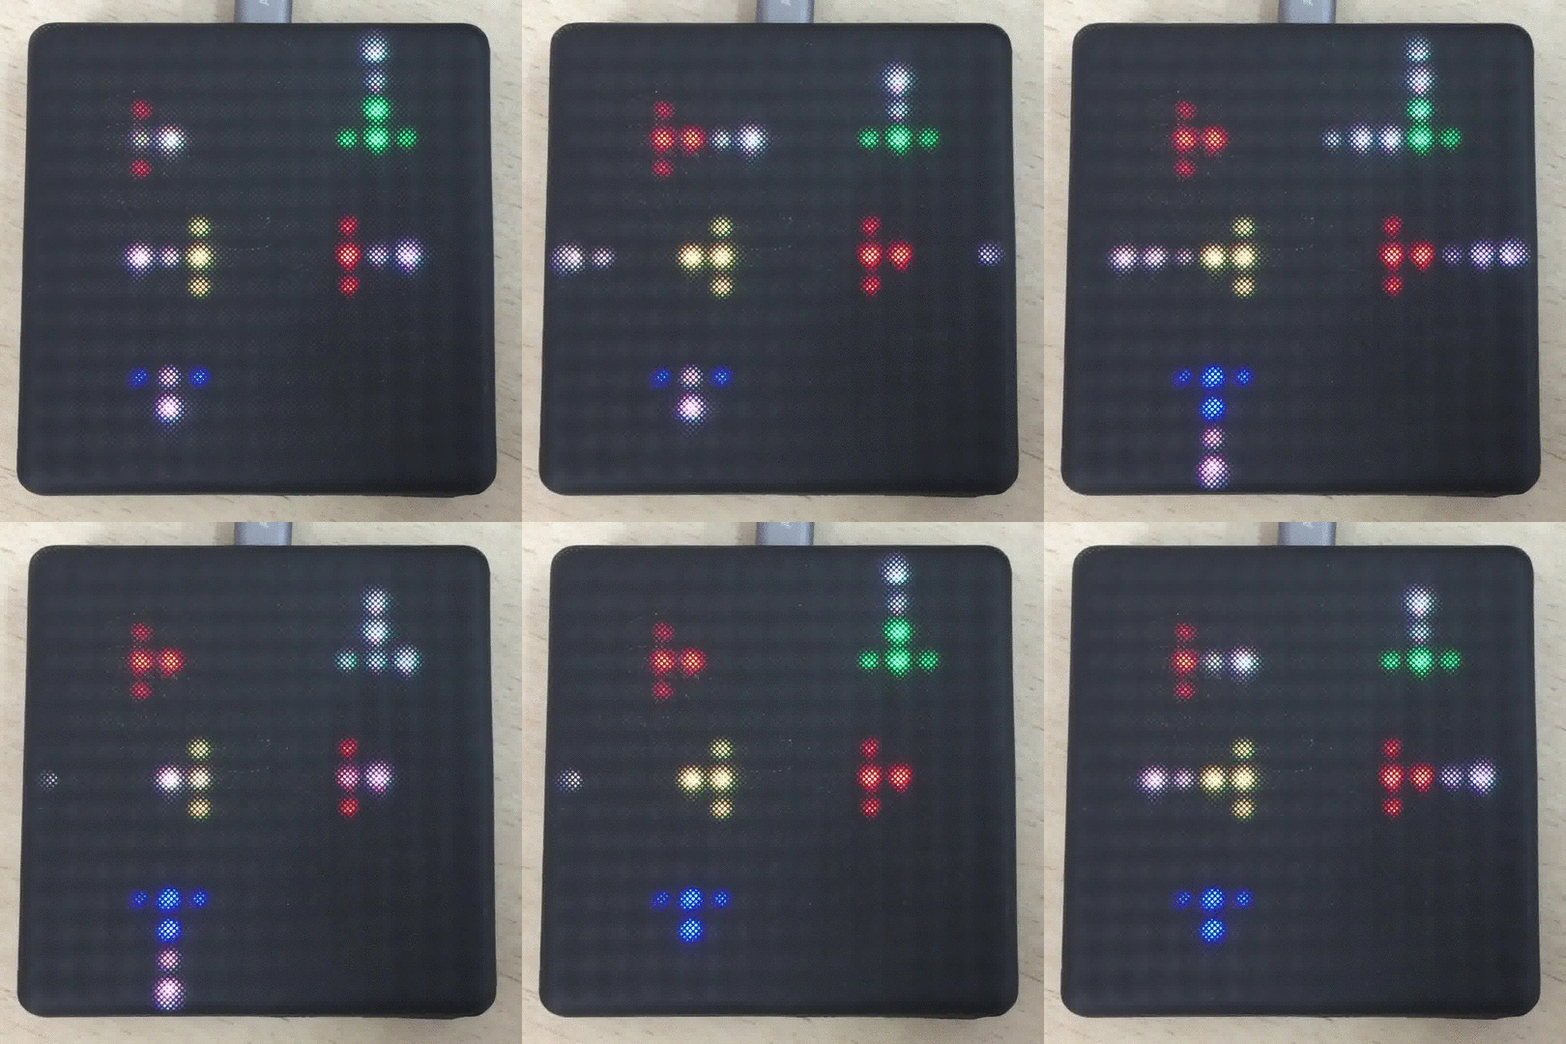
void updateBullet1()
{
if (blob1d == 0)
{
bullet1y -= speed;
}
else if (blob1d == 1)
{
bullet1x += speed;
}
else if (blob1d == 2)
{
bullet1y += speed;
}
else if (blob1d == 3)
{
bullet1x -= speed;
}
}
//...
The music generator blobs and bullets

Generating MIDI Messages

Now that all the visuals are implemented we have to generate some MIDI messages to trigger sounds from the host. The detectBullet() function is called periodically in the repaint() function and performs some basic collision detection.

void detectBullet()
{
if (bullet1x > 15)
{
spawnBullet1();
midiNote (0, 0);
}
else if (bullet1x < 0 && bullet1x > -90)
{
spawnBullet1();
midiNote (0, 1);
}
else if (bullet1y > 15)
{
spawnBullet1();
midiNote (0, 2);
}
else if (bullet1y < 0 && bullet1y > -90)
{
spawnBullet1();
midiNote (0, 3);
}
//...
}

Here we check if any of the bullets have crossed the screen boundaries and spawn a new bullet when the old bullet becomes off-screen. Notice here we make sure the default value of -99 defined in the initialise() function does not trigger the spawning of a bullet. We also generate a MIDI note by calling the helper function midiNote() defined hereafter:

void midiNote(int note1, int note2)
{
note2 *= 12;
int note = rootNote;
if (note1 == 0)
{
note += note2;
note1 (note);
}
else if (note1 == 1)
{
if (chord == 0)
{
note += 4;
}
else
{
note += 3;
}
note += note2;
note2 (note);
}
else if (note1 == 2)
{
note += 7;
note += note2;
note3 (note);
}
else if (note1 == 3)
{
if (chord == 0)
{
note += 11;
}
else
{
note += 10;
}
note += note2;
note4 (note);
}
else if (note1 == 4)
{
note += 14;
note += note2;
note5 (note);
}
}
@ chord
Definition: roli_BlockConfigId.h:59

In order to play a harmonious set of MIDI notes, the above function generates specific notes that form the chord with a root note and major/minor quality as defined in the parameters. It follows a simple set of rules as follows:

  • The index of the blob defines the note in the scale in ascending order: tonic, major or minor third, fifth, major or minor seventh, ninth.
  • The direction of the blob defines the octave of the note in ascending order: east, west, south, north.
  • If the chord parameter is set to major, the major third and major seventh are selected forming a major seventh chord.
  • If the chord parameter is set to minor, the minor third and minor seventh are selected forming a minor seventh chord.

The selected note is then passed to the following helper function in order to stop the previously ringing note and start a new one using respectively the sendNoteOff() and sendNoteOn() functions with the channel number, the note number and the note velocity as arguments.

void note1 (int note)
{
sendNoteOff (0, lastNote1, 80);
sendNoteOn (0, note, 80);
lastNote1 = note;
}
//...
void sendNoteOff(int channel, int noteNumber, int velocity)
Sends a key-up message.
void sendNoteOn(int channel, int noteNumber, int velocity)
Sends a key-down message.

Summary

In this example, we learnt how to create a music generator app that sends MIDI messages to a host.

See also